Saturday, April 30, 2011

I am so close Big Beauty

Here is Big Beauty:August Garden

Here is Big Beauty Iris

As soon as my blog reaches the magic and astounding 100 followers I'm going to have a draw among my you, the winner will receive a big beauty in colours of their choice. One yard of amazing wool!
So spread the word.... let's get as many followers as we can for this blog ... I'll send the wool anywhere!


Friday, April 29, 2011

Darcy Does a Great Job

Look what Darcy made in our online dye class
AMAZING!!!


And here are my dyed knops spun into gold!
I hope you find some time for creating this week-end...

Wednesday, April 27, 2011

Hooking With Handspun Class


Knopion, Trillium, Rampion


I just got an order of knops delivered to my house and I spun some up undyed into roving. You can see them starring in above photo as white bits of unbuttered popcorn.
My real desire was to dye them of course. I made a warm selection, a cool and a multicoloured mixture. It was quite a delightful sensation to play with these in wet soapy water.
Oh do you know what knops are?
The are bits of wool placed in a centrifugal force machine that rolls them into balls to be used in the making of pillows. At least that's how and for what mine where made.
When it came time to dye them I got most of them out of the pail and into pan... but catching the last 5% was like trying to catch tapioca in a pail or frog eggs... very elusive!
Finally I had to strain them. They all kept wonderfully separate as I dyed them and grew even longer tails to catch up in the draft.... sounds like I'm talking about tadpoles or dragonfly nymphs. Here they are.


We were walking the Bruce Trail on Monday and although cold in Wiarton when we left home Jackson's Cove was amazingly warm, we had to start stripping off as soon as we left our car.
And look what a splendid site I saw, a trillium thrusting up its sturdy leaves through the fallen curtain of brown paper bag leaves.

And here, spring tonic for every good Ontarian in this vicinity, Wild Leeks, Allium tricoccum.
I grew up here and it was a grand tradition to go out leek hunting, bring home a "feed " Everybody would sit around cleaning them. I think they got blanched and then cooked in scads of butter and salt and pepper.
I really do love the smell of them. But I never eat them. They make garlic breath seem by comparison, most pleasant. It is like comparing a match to the Towering Inferno. A glass of water to the ocean. A toothpick to a mighty oak. You get my drift. Man of course had to pull one and have a little nibble. I guess that's a small price to pay for my recent heart rock.
People tell tales of being sent home from school after eating them because they poisoned the air of the whole one room school house!

There are daffodils and spring peepers and I'm a happy girl, how's it going for you Cathy?

Monday, April 25, 2011

Want to hook realistic portraits?

The Town Hooker- hand torn strips

If you are interested in hooking realistic style portraits today is your lucky day! Join this online class to develop amazing skills that will enhance everything you create.

ANNOUNCING: Wanda Style Portrait Skill Building Class

This class will change the way you hook. I'll teach you the skills and techniques I use to make realistic portraits and how I hook anything alive with colour and depth of field.

Everyone will use the same small pattern, supplied to you along with other printable tools. Cut and fabrication choices are up to you.

Class is set to commence on or about May 10, 2011 and last a month.

You will receive more attention than you thought possible. Class size is limited. You do not need to be present at any specific time. You do need computer skills, a printer, a digital camera and a wide open mind. Due to the unusual and highly interactive nature of this class the fee schedule is different.

Cost $100 CA


Other payment methods can be arranged if needed.

Tuesday, April 19, 2011

Heart Found


I wonder if some one lost their heart on Sauble Beach last summer or maybe in Bay City Michigan a few years ago? Let them know I found it and it is good shape.

Let's take a look at this!


Yes my friends, it's that time again.... I found this in the LACMA Collection of textiles.
Peru, South Coast, Nasca, Wari - related, Man's tunic 500 - 800 Textile
Camelid fiber , tied dyed ( shibori ) plain weave with discontinuous warps and wefts.
35"x45"

What do I want to talk about ? A buncha rectangles on a bunch of squares...
Are you bored yet?

I want to start by saying this is a very appealing work of modern art for such an old piece.
So what is new is really old or what is old is new again....whatever. This tunic has many good design and colour secrets and stories to reveal to us when we look closely.
I see 5 colour families
yellow
green blue
red
white
yellow green
That's a very fine number of families to involve in any project, the uneven number is always welcome.
The colours, via the resist dyed patches play and replay over the construction of this tunic.
If you look at the vertical lines you can see 3 or 4 of the colours in each stripe as well as the foundation colour. This helps us feel deeply satisfied and allows us to feel delighted when something unexpected pops up.
Then we look from side to side we can see the resist squares are punctuated with plain ones. Partnered with a lighter or darker square they march along like an old married couple, present but with thoughts of their own ready to come together in conversation if something intrigues.
I love also the pattern shifting from side to side on the stripes. Like driving on a curvy road on a summer day, the fresh breezes coming from different directions at each turn. Ohhhh that's good.

What do you think of that white bar?
For me it is a wonderful high spot of focus, needed when other values are close. It is the TADA moment wedged between two darks.

Oh and can I talk about that olively green a minute? That dull old bit'a business just makes this tunic rock. It ain't saying much but when it does it's like a piece of plain cheese cake, you are just so glad it was there. I say was there because it was so good you ate it. Imagine it not being there, not right is it?

Lets look at those little tie dye or resist squares.
See how each one has an X in it? And round ended diamonds that match up with the other square. My how our eyes like to look for this pattern once we recognize it, we dance around looking for what we know. It's like going to a dance and spotting your friends across the hall. Anxiety dissolves into joy when we see them scattered around.

Take time to take a good look at something today, it will do you good!

A little something for you from my boyfriend!
"Joy in looking and comprehending is nature's most beautiful gift. "
Albert Einstein


Monday, April 18, 2011

Adventure

I look like I'm taking a country stroll don't I? This is camera trickery... I am walking straight up the side of a cliff. It is hard and steep.
There was a reward though and it is on Man's shoulder, he is only mildly happier here than in our last photo of him. Just his way. Doesn't want to take away from that tough prison guy look. Oh look the rock is knocking his hat to a rakish angle.
Will he like looking debonair?
And here is the dear prize brought down the cliffside to home by my dear heart!
Why do I make him do this? He's been walking in unintentional circles since yesterday from this episode.

Sunday, April 17, 2011

Canadian Tire!!! is For Dyers


This baby is all we desire......
My oh my ... how we Canadians lust after the "in America only" Kitchen kettle for dyeing.
I don't rightly remember how this rage for Presto pots began but I first saw one at The Northern McGown teacher's workshop, Helen Connelly was showing us what she did with it in her class for baby teachers. (It used to be called a Fry Daddy or a Fry Baby) You all know that must have been a while ago due to my current status as a jaded old hooker..

The kitchen kettle (go here to read and try to suss out why Canadians are not deemed by our government mature enough to handle them, you KNOW we are always putting cords in our mouths!!!) is quick, self contained and has a great temperature control. BUT WHY DO WE THINK WE NEED THEM? Is it the same feeling I got when I was 12 and looked at Seventeen and longed for Bonne Bell products? Because we ain't got it we want it all the more? Scarcity breeds desire and all that? I'm putting an X through that baby.
Please let me wave this awhile:


Thank you for indulging me... I 'm writing to tell you though I have kitchen kettles I highly recommend the good old rice cooker that you can buy in any country rice is cooked.
It is just as good, maybe better in my mind because if it gets boiling away too much mine will switch itself down to warm from cook. We can buy them here, they are not expensive and most come with steamer basket, a boon for doing little saran or foil wrapped dyed dumplings while you dye bigger things below.
For the regular home dyer you cannot beat it!
They come in a variety of sizes, I have a very simple one, with a removable lid, I advocate that. Look here to see what I mean about lid styles.
Right now Canadian Tire has a sale on them as well as a set of three Anchor Hocking glass measuring cups for 1/2 price, you cannot have too many of those!!
Go Canadian Tire!!! Dye Canada!

Wednesday, April 13, 2011

It started with a question about clouds.

I love looking at clouds and I love learning what comes together to make them form in the myriad ways they do.
So I was delighted to get this question sent on the week-end on The Welcome Mat.

Help! I am struggling with how to hook the clouds/sky in this feedsack. I am working with #3 and #4 cuts. Had half the clouds done and ripped them all out as once I started to hook the background sky it all looked stilted and horrible. The colors you see are printed on the sack itself and not the wool I am working with.


Saw someplace on TWM where Wanda had talked about hooking couds with dip dyed wool ranging from blues toward bluish whites...but I didn't understand how that could be done. When I first tried these, I hooked around the edges of the clouds and then filled in with hooked shadowing beneath (i.e. following the outline shape). Then tried horizontally hooking casseroled dyed wool for the background sky that had mottled blues, whites, pinks. It looked terrible. NEED help! All suggestions welcome! (PS: At this time, do not plan to hook the snow on the mountain peaks beneath the skyline. Unless, of course, TWM members advise otherwise!) Thanks to all in advance for your help.

Dear Friend:

I'm pretty sure I don't advocate the use of dip dyes to create isolated clouds in skies. I think I'd rather shoot myself than say that. Though I once did paint clouds onto a dip dyed piece of wool, this way the sky and clouds get hooked in by simply keeping the wool in the order you cut it by taping it down.


Keep it simple as per your feedsack.

You might want to alter your sky to be lighter on the bottom and brighter on the top.

Here are some visuals if you want a more realistic portrayal. You need grays on the bottoms of the clouds to ground them in the atmosphere. I vote for the snow- more dramatic this way, a tension is built between hot desert and cool mountaintop aside from the physical height.


Hope this helps.


Thanks, Wanda! Still more questions though. Do I hook the clouds in horizontal rows or do I shadow hook their shape outlines? Oh, yes! The visuals really help with seeing what the grays do and how the sky is brighter at the top than on the horizon! Amazing what we miss until someone else brings it to our attention.


Dear Friend,

You might be surprised to hear I don't give two hoots for so called directional hooking. We make way too much of it and it sometime detracts from what we want to accomplish.


So the clouds are puffy, what kind of line will help them look that way? I think you might know already... and I want to hear what you think....


Wanda,

My guess would be circular, but I really don't know. I wish I did! I find it interesting that you don't believe in directional hooking. Isn't that the 'mantra' of McGown teachers and all those doing fine shading in florals/fruits??? This is a totally new idea for me!


Hmm..you got me thinking about those shapes...went back and looked at photos. The lines I see there (I think) are flattened elongated S's that are on their sides...if that makes sense.


However, I am remembering also what you wrote about how often we see what we believe rather than believing what we see. That statement in itself could lead to some extremely interesting spiritual/philosophical discussions re: realities.


Dear Friend,

I think your observations of elongated s are good, I'd probably try long tailed Cs

Yes you can fall right into a big old Zen trap.

But when I talk about doing what's there I mean that literally, like in the right brain way and don't try to make too much sense of it with your rational brain. Your brain wants to tell you, those are lips so they better be bowed and they better look shiny when your visual might tell you they are flat thin lips that only show up on one side and then disappear.

I hope that explains what I mean.

You know that I'm a McGown teacher and we aren't all cut from the same thought or practise cloth! LOL!

No matter the source always ask your questions. That's how you'll know the answers, the best ones for you.


Wanda,
Oh Boy! That makes total sense...My mind said circular, my eyes saw elongated S's on their sides and you recommend trying long-tailed C's...kind of a blend of the circular and the S waves. Imagine that! Going back again to look at the photos, I know what was wrong before! Wish I hadn't ripped it all out, as parts of it were "right"...i.e. the pale gray/green at the base of the clouds I had hooked. My mistake was in where the clouds hit the mountains...which I had hooked directionally on a sort of angle...so it ended up looking like a melting ice-cream cone rather than a cloud! The base of the cloud needs to be more horizontal I believe. Thank you, thank you! The best part has been to begin to change my way of thinking and seeing, rather than just the specifics about clouds! What a wonderful thing to be able to activate in another person! I am SO glad I was led to TWM...have recently added listening to a section in The Music each morning as well as all the other exploring I am doing! I am not a 'lurker in the weeds!' Cheerio!

Isn't that great? This is the best kind of learning, the kind you discover for yourself.

Tuesday, April 12, 2011

So much to tell

Lots of things are happening and I'll try to be brief, that is not my strong point - I warn you.

The Welcome Mat
We are having a Fibre Fun Friday and week-end long extravaganza.
This will not involve bran flakes to any great degree but somehow we are soldiering on with out it. We are having fun.... more fun that a scarf covered tractor!
Is nothing sacred to lovers of wool?


We are making nests!
Here is a beauty from Welcome Mat member, Linda Burke:

Isn't this little nest divine?
We are having a fibre swap, send one oz. to a computer generated partner this Monday!
We are going to have an online free lesson including a pattern and another challenge to see what surface destruction we can cause a piece of wool. It is a great time to be a fibre artist with all the delicious options.

From The Studio- On the Mat I'm now offering a couple of treasures from the my lair during the week, this is today's special.
If you want it write me!


Remember you can join the Mat for a trial period of one month, maybe this would be a good time to try it out, the excitement is both positive and contagious. If you are in "the between season doldrums", this is surely the CURE.

Wanderful Dye Kitchen
Today I posted the class outline for the Dear Beginner Dyers
Here it is in case you were wondering what will happen inside that ground breaking place.

Beginner Dye Class Outline

Lesson #1

Part One

Getting to know your tools, dyes, wool and measurements so you control your outcome, including wool measuring charts and how much dye to create certain values

Part Two

How to dye wool, silk and nylon

4 Recipes, 4 methods

Lesson #2

Part One

Making your own formulas- with the knowledge from lesson #1 you will easily make you own wonders.

Part Two

Guided Explorations

I’ll give you 4 dyeing assignments to firm up your nerve and cement your understanding.

BTW
You can take this class at anytime during the month. One lesson will be posted each week and you will have all the written materials, photos and links to videos sent to you to help you in the future. If you are interested you can sign up here.

The Face class you say? It is set to begin just after Easter, as soon as the dye class is underway, look here for details. I can run two classes but I can't start them all at once.
Thanks for understanding!

And I had the most amazing email conversation over the week-end which I'll be posting here tomorrow. It was all about learning. Self learning, the best kind!

I also got a boxful of goodies in the mail to show you but I fear I've prattled on way to long so until tomorrow, happy hooking , creating, spinning and dyeing!


Yes I must go and contemplate how I got this turkey neck and I'm not even singing opera any more. Look how he's got me at the edge of a cliff again, if anything, you know, drastically untoward happens, you'll tell won't you? Notice he changed nature's whole outfit...made it fall when its spring... diabolical


Sunday, April 10, 2011

Heart Rock #2


Found this one down by the boat launch near the water treatment plant. It's indent creates a heart too.
In the background you can spy a little hooked mat by Margo White.

Friday, April 8, 2011

Dye class in Wanderful Online Dye Studio


Dear Beginner Dye Class

Please join us in this class to get a better handle on dyeing. We will look at getting you cozy with your personal dyes, all brands welcome and creating your own formulas and teaching you 4 dyeing methods.

Two full and wide ranging lessons.

Cost $40.00

This class will take place in the online Wanderful Dye Studio.

You will receive your invitation when you sign up.

It will start on April 18th 2011

Press this button below to secure your "seat" in class. Please write wlm@bmts.com to secure other payment methods.


>You are required to have wool, dye equipment and dyes, I have a list of inexpensive tools you can use and one of more comprehensive equipment if you wish to be more than a dabbler... look below.
No dyeing experience is necessary. Your attendance in class is at your leisure, no need to be online when class is posted. Any questions?

The dye dabbler list:

Here is a list for you of tools and materials you need if you just want to try dyeing out with out a big investment.

Rit dye: choose a colour you would like in your rug. Here is the colour chart.

aluminum pans ( at least two 8x8" ) and cookie sheet to hold them and carry them to the oven

toothpicks

chop sticks

wool

glass jar

old pot holder

That's the minimum.

The True Blue - I'm gonna be a dyer list

Here is an equipment list you can use to be a right proper dyer as I live and breathe today.

Dyes- get one specifically for wool (protien fiber) , the results will be better.

I like Majic carpet brand for beginners, only 14 dyes, the browns are true brown, the greens are not alike, strong yellow, good red violet, great black. They are about $50 fromwww.let'shookrugs.com( CA) or our member Ken Carpenter in the States.

Citric Acid -the no smell, no fuss , no dilution acid for acid reactive dyes.( that includes, cushing dyes, pro chem washfast acid dyes and Aljo dyes, the most commonly used rug hooking dyes.

Wetting agent - shampoo, or synthropol or jet dry

This item and the above one are available at prochem listed in dyeing auxilaries

and can be shipped to you.

Dyeing Containers

A flat pan with 4 inch sides, large enough to hold one 1/2 yd in it squished, a 9"x13" inch pan is just a little too small for all purposes ( for spot dyes and chelsea rolls and marbelizing in the oven)

One bigger kettle type pot

One electric frying pan and a kitchen kettle and a crock pot.

Now I try to get the latter items at yd sales or wait until they are on sale. You can also repurpose items you already have, remember dye once and they remain the property of the dyer.... no longer fit for the kitchen.... this is sounding surprisingly like a battle for my soul...

Measuring spoons

I look for a pinch a dash and a smidgen spoon, the smallest one is 1/32 tsp.

A set of very cheap regularly sized measuring spoons starting with 1/4 tsp.

A wooden spoon and stir sticks

Glass measuring cups with handles

And of course you will need water, wool, heat. I like to have a paid to put hot wool in and to carry it from stove to sink as well.

If you have these you can dye anything and everything.

To start with you can leave these three "One electric frying pan and a kitchen kettle and a crock pot. " out of the picture until you want them or if you want to do smaller amounts of wool I would start with these three pieces of equipment to dye in.

Just for interest's sake, here is a note I made to help dyers get what they needed back in 2003:

What you Need to Become a Dyer

Dyes

I recommend new dyers purchase the 13 dye Majic Carpet set from Rittemere Hurst Field

( 1-800- 268-9813 )

Wool

I try to use the best possible wool I can afford. We can dye any wool using our acid dyes as well as silk & nylon.

Wetting Agents

In order to dye our wool we must make it good and wet so the dye may pass through the fibres. There are three things I use.

Liquid dish washing soap - wool must rest overnight in a pail of warm water and a few drops of this.

Jet dry - this is what I use most often. Wool need only sit in this for 10 minutes before it is ready to dye. It will also speed up the process a great deal if placed right in the dye bath. Just a minute amount is needed.

Synthrapol or Wetter than Wet - this is what is sold at Prochem Dye as the recommended wetting agent for their dyes. It has been said by some veteran dyers that it is not necessary to presoak wool at all using these, just place into your dye bath

with your wool.

Acid

To make your colour set into the wool, vinegar or citric acid crystals from Prochem or the drug store.

Equipment

BEWARE----- You should never use any household utensil for food preparation after it has been used to dye wool.

Dye pans- I use the following , enamelled refrigerator bottoms, medical enamel trays and pans,old, pots no longer viable for cooking, electric frying pans, steamer, aluminum foil, cling film. I long for a deep fryer.

Stirring utensils- I like to use tongs,wooden rulers,wooden spoons.

Measures - glass measuring cups, jar with measures on the sides, measuring spoons from 1/8 th tsp. to 1Tbsp. for dye solution and dry dye measuring spoons 1/128th ,1/64th and a big supply of MacDonald’s coffee stir spoons (NOTE: no longer available in North America so sad.)

Jars - You can never have too many of these. I save the large spaghetti sauce ones to do swatches. Smaller ones I use to store and mix dye solutions. Save as many as you can store.

Safety Equipment - rubber gloves and a mask to wear while measuring dry dye, damp newspapers to attract flying dye particles or a damp piece of wool.

True Story

Thursday, April 7, 2011

Breakfast at Wanda's

So I wanted a little bite of toast this morning. That's not a crime is it? But burning my house down is! Before I knew it my "toast" was aflame and the thick black smoke was everywhere. There were FLAMES people.... yellow orange, licking FLAMES. Once I got that out and thrown to the deck ( yes, that is my special place to throw unwanted household stuff including flaming toasters and mice) I set out to burn something else completely by accident, really officer, it was an accident.....

The Toast


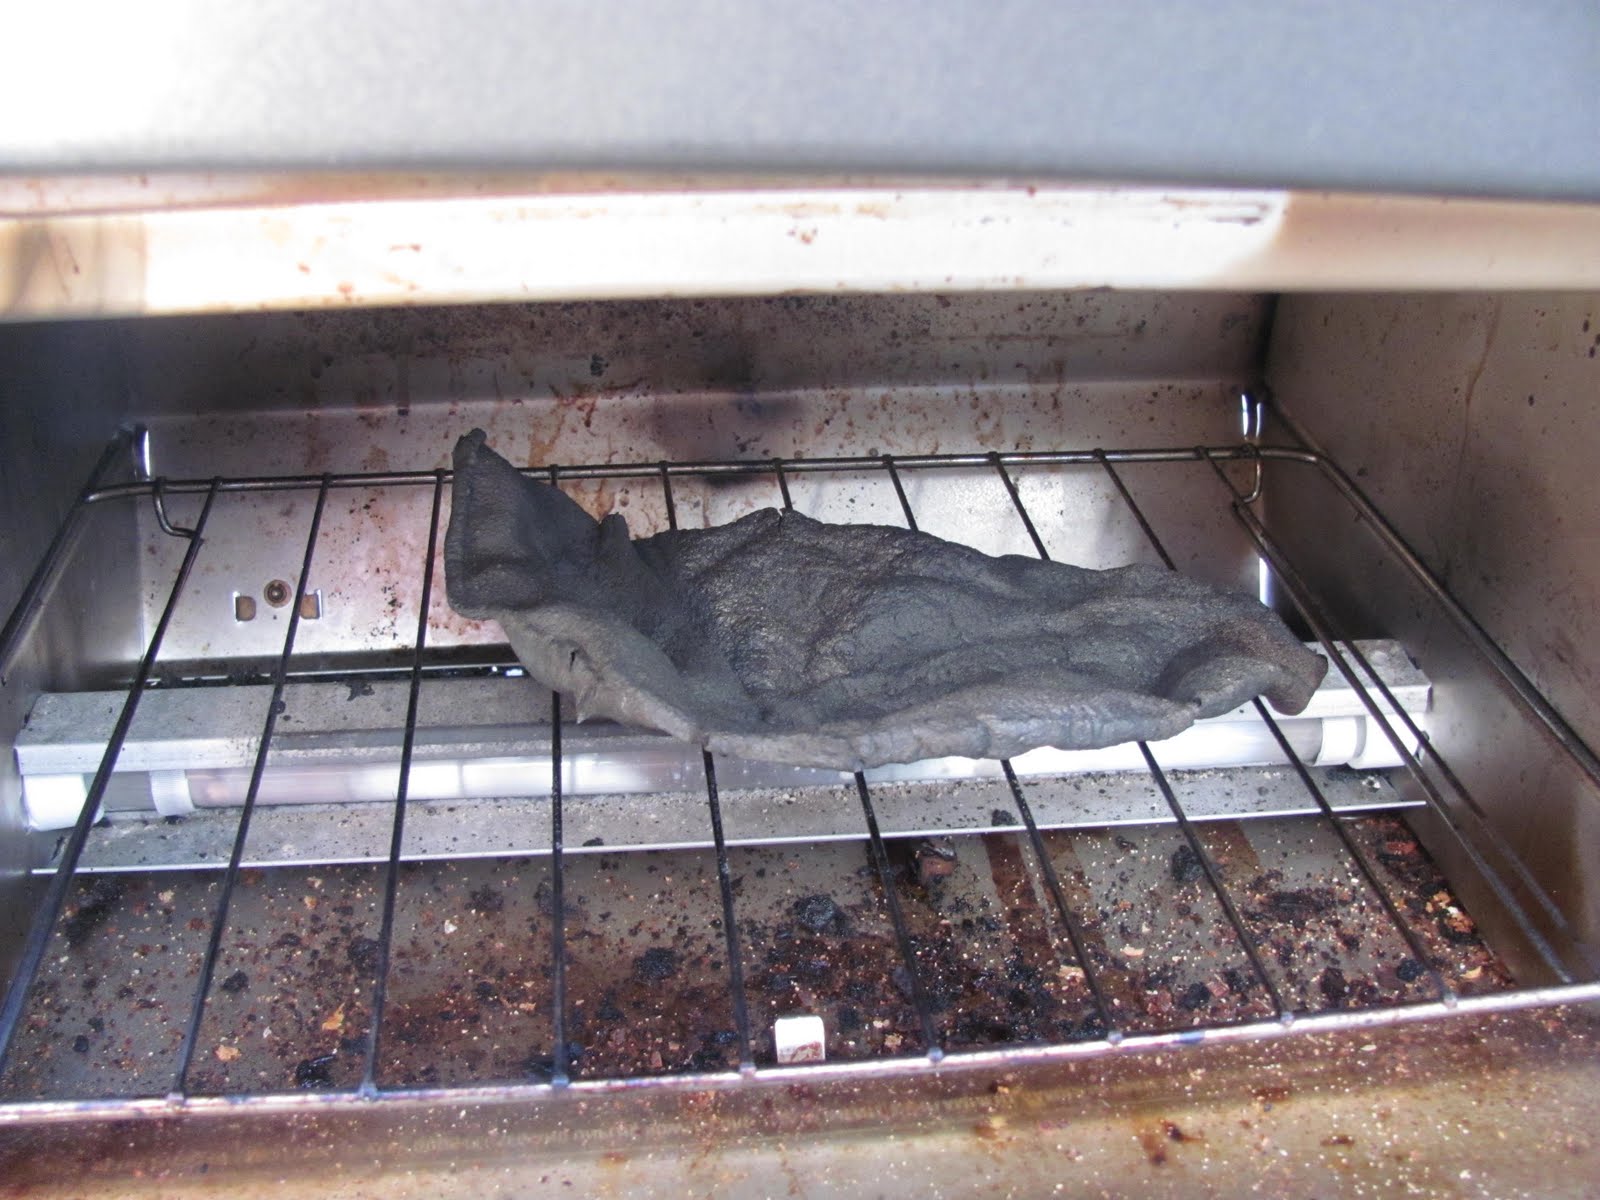
This is not asphalt, lava rock or coal. It is not tar sands, it is not petrified dinosaur hide, it is not cinders.... ok ... maybe it is cinders. What it was meant to be was the treat for hook-in today.
Now the very sad news is I did the self same thing to the treat for hook-in last week, peanut butter brownies.
What did the two recipes have in common?
I had to melt chocolate.
I had to melt chocolate on a low flame.
A low flame I cannot seem to see nor remember to shut off.
Once baked I set the goods out on my stove RIGHT ON TOP OF THE BURNER THAT IS NOT SHUT OFF....... OMG!!! Several minutes, maybe an hour later I smell something still baking as in the case of the pb brownies or as in today due to the rancid smoke filled house and afflicted nostrils from the aforementioned toast incident, I had to touch the pan before I caught on.... why are you oven hot when I you've been cooling for 45 min... ?
OY OY OY.
Even betty crocker is pointing her broken spoon at the mess I made.
And Bless my hookers, they just keep on coming! I handed them out gas masks and hazmat suits and we all just carried right on. If you look to the right you can see the charred toaster door.
Man just wondered if I plan on bringing it back in and cleaning it up....
Not likely Mr. Man, not bloody likely.

Wednesday, April 6, 2011

April Happenings on The Mat

Before I start talking about the Mat I wanted to let you see my new makeover. I'm so happy with it I turned it into a Calendar! That box in my hands is full of wool!

And now to The Mat doings...

A Challenge
A daily circus is mine to watch out my back window as the crows caw and spin and gather their nesting materials. Too bad they can't get in the house because I have lots of goodies they could create with in here.

I bet you do too! So here is our challenge: Build us a nest that represents you!

Yes sing out to us like this little Robin , show us your tribute to your everlasting piles of wonderful stuff!

Criteria

Only found or recycled objects

Can be in any material and I mean any, try to use a method or material you've had on hold so far and haven't got around to using.

flat, 2 or three dimensional

have messy gluey, stitchy, happy fun!

Deadline - yup that's an ugly old word ain't it?

Let's try to get them done in a couple of weeks for Friday April 15- Fibre Fun Friday, a newly proclaimed holiday on the Mat.

Need impetus?

These will make wonderful keepsakes of this long awaited spring and great studio decorations.

You need to make something soon, and I mean soon.

Inspiration from Nature

Inspiration from Artists

How it will work

I'm starting a Play Day Group Discussion to support the nest building activity! It will be called Build a Nest. Finished nests will be posted there.

Not interested this time? There are plenty of other things to read and do in Play Day!Got questions? Ask them.

Fiber Fun Friday

On April 15th we are having a fibre holiday, it will stretch into the whole week-end. There are many things planned, a free class and give aways and a member mix up to name a few.

Hmmm how do these pictures of me keep popping up?

WandaWorks is offering two online classes soon- look here to sign up in a few days.

Note: WandaWorks is an entity outside the realm of The Mat. These online studios offer more attention and guidance than what can be provide in this magazine. There is a fee for partaking in these lessons

The Classes:

Sign up day is coming soon for a class in my online dye kitchen, Dear Beginner Dyer, for novice dyers or those who want a better handle on dyeing. This is a class with 4 lessons, you will receive a pdf booklet at the end of class containing all lessons, links to videos and good questions asked and answered in class.


In my online studio there will be a 4 part class called Let's Face It. Learn how to create a portrait using my techniques, we will all build the same portrait in this class so you can learn from each other. It is a small face slice. I reveal all my tips and tricks about portraits and colour. Booklet will also be prepared for your perusal after class.

Yes these booklets will be for sale afterwards but they will not be supported, that means no asking me questions.

Prerequisite for this class: you must suspend your long held beliefs.


Remember you can sign up to The Mat for free for a month... ( look to the right) come join us , we are having a ball, a big old ball of wool that is! The Welcome Mat is the best kinda nest!

Tuesday, April 5, 2011

Plastic Flowers and Flying Saucers of Wool!

Here are some photos of some old plastic flower that blew up into my yard today Cathy.They are as fake as the day is long, I'll be lucky to see a crocus before July 4th.
See how they are all bent over ? Old and half ruined too. Ugly old things.
Defiant as usual I declare that roving does not need to be hand painted to create that " rainbow effect" Why waste your time? It is so quick to do with out any fuss or plastic or brush. Unless you have hours of time to squander dabbing at wool with brushes.... alls I'm saying is, you don't have to!
This one has the Mary seal of approval and that's saying something. Good for kneading even when wet!

Monday, April 4, 2011

All in a day's work

Some upcoming RHM doings

What I did between, more three ply in the purples. It's as thick as a rope!!
You should see my hair from the steam.
Really.
It is only hair a very long term partner could tolerate or a blind man.
Luckily I'm by myself so no harm done!
And you won't tell will you?